How to Book a meeting slot using React Big Calendar

In this post lets look at how we can book a meeting on a calendar (React Big Calendar).

In your project home directory first install the required npm package.

npm i react-big-calendar --save

Now you can import the package in your component as below:

import BigCalendar from 'react-big-calendar'

To display the calendar view on your webpage you need to invoke the component with some props as below:

 <BigCalendar
                  events={myEventsList}
                  views={allViews}
                  step={30}
                  timeslots={2}
                  defaultView='week'
                  defaultDate={new Date()}
                  components={{
                               event: Event,
                               agenda: {
                                        event: EventAgenda
                               }
                 }}
              />


We need to define the two functions Event and EventAgenda for the Agenda view to work on the calendar:

/*Agenda Rendering*/
//Outside the class
function Event({ event }) {
    return (
        <span>
      <strong>
      {event.title}
      </strong>
            { event.desc && (':  ' + event.desc)}
    </span>
    )
}

function EventAgenda({ event }) {
    return <span>
    <em style={{ color: 'magenta'}}>{event.title}</em>
    <p>{ event.desc }</p>
  </span>
}


The calendar component is dependent on moment.js as well. So we need to install and import moment.js as follows:

npm i moment --save //In the root of the proj directory
import moment from 'moment'; //In the calendar component

We need to initialise the Big Calendar using moment JS inside the calendar component:

//Outside the class
BigCalendar.momentLocalizer(moment);
let allViews = Object.keys(BigCalendar.views).map(k => BigCalendar.views[k])

Now we need to provide the events data to show all the booked slots. So we need to provide a JSON in following format:

var myEventsList = [{
    'title': 'Conference',
    'start': new Date(2017, 3, 11),
    'end': new Date(2017, 3, 13),
    desc: 'Big conference for important people'
},
    {
        'title': 'Meeting',
        'start': new Date(2017, 3, 12, 10, 30, 0, 0),
        'end': new Date(2017, 3, 12, 12, 30, 0, 0),
        desc: 'Pre-meeting meeting, to prepare for the meeting'
    },
    {
        'title': 'Lunch',
        'start':new Date(2017, 3, 12, 12, 0, 0, 0),
        'end': new Date(2017, 3, 12, 13, 0, 0, 0),
        desc: 'Power lunch'
    }]

Now this should show all the booked slots on the calendar if you navigate to the right dates.

The next steps will let you choose a slot and book a meeting:

Below props need to be sent to the existing BigCalendar component:

selectable
onSelectEvent={event => this.onEventClick(event)}
onSelectSlot={(slotInfo) => this.onSlotChange(slotInfo) }

Now the render function should have the BigCalendar invocation as below:

<BigCalendar
    selectable
    onSelectEvent={event => this.onEventClick(event)}
    onSelectSlot={(slotInfo) => this.onSlotChange(slotInfo) }
    events={myEventsList}
    views={allViews}
    step={30}
    timeslots={2}
    defaultView='week'
    defaultDate={new Date()}
    components={{
                 event: Event,
                 agenda: {
                         event: EventAgenda
                 }
    }}
 />

Lets define the functions that are being sent as props:

/* When you choose a particular slot on the calendar */
onSlotChange(slotInfo) {
    var startDate = moment(slotInfo.start.toLocaleString()).format("YYYY-MM-DD HH:mm:ss");
    var endDate = moment(slotInfo.end.toLocaleString()).format("YYYY-MM-DD HH:mm:ss");
    console.log('startTime', startDate); //shows the start time chosen
    console.log('endTime', endDate); //shows the end time chosen
}

/* When you click on an already booked slot */
onEventClick(event) {
    console.log(event) //Shows the event details provided while booking
}

Now you can build a view to use the selected time slot and book a meeting:

You can refer this page for more details on the calendar component:

Github

Live demo of different views can be found here:
Demo

Steps to display Googlemaps on Android Emulator

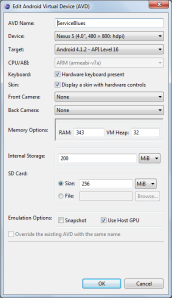
Integrating Google Maps (or any map service) is always a nice feature for our applications, but it seems to be “complicated” for integrating Google Maps because Google Maps is not officially supported in emulator because lacking of Google Play Service. That forces us to use a real device during developing app. For me, not nice. So in this post, I would like to show step by step how I configure my emulator so that a Google Maps app can be installed on there. To make such an emulator, we have to use a set of correct settings/files. If not, it won’t work. So you have to set all settings like mine. My emulator targets on Android 4.1.2 – API Level 16.

avd

1. Install Google Play Service packages into emulator.

1.1 Start your emulator. Disconnect any other Android device (such as your smartphone) from computer.
1.2 Download these two files
com.android.vending-19032013.apk : http://www.mediafire.com/download.php?7jfar2v1bzx6v59
com.google.android.gms-19032013.apk : http://www.mediafire.com/download.php?4o9fz413uavlblf
1.3 Open command console, go to <android-sdks>\platform-tools (my case : C:\Users\ServusKevin\android-sdks\platform-tools). Install two files above with command

adb install <path>\com.android.vending-19032013.apk
adb install <path>\com.google.android.gms-19032013.apk

If installation is successful, you’ll see message Success at the end

Vending Gms Installation Successful

If installation failed, see hints at the end of this post to solve your errors.

2. Download and configure the Google Play services SDK.

The Google Maps Android API is distributed as part of this SDK. The current version of Google Play service is r6. But don’t install it from SDK Manager. Our installed Google Play packages before is compatible only with r5. Therefore download Google Play services SDK r5 from this following link http://www.mediafire.com/download.php?l6n6waw2w92cuk3 extract it to folder <android-sdks>\extras\google . If you already installed r6, uninstall it. If not, you’ll get error “Google Play services out of date. Requires 3027100 but found 3025110″.

3.Obtain an API key.

You will need to register a project in the Google APIs Console https://code.google.com/apis/console, and get a signing certificate for your app.
3.1. Open command console, go to <jdk>\bin (my case : C:\Program Files\Java\jdk1.6.0_37\bin), enter this command “keytool -v -list -keystore <debug.keystore> “. Please note that the <debug.keystore> can be located at following folders C:\Users\ServusKevin\.android\debug.keystore or C:\Users\ServusKevin\android-sdks\.android\debug.keystore . It depends on your IDE, default is in <user>\.android\debug.keystore but in my case, is in <android-sdks>\.android\debug.keystore. After running the command you’ll get SHA1 fingerprint

SHA1 Fingerprint

write down your SHA1 Fingerprint C7:04:A8:75:xx:xx:xx:xx:xx:xx:xx:xx:xx:xx:xx:xx:xx:xx:xx:xx
3.2. Go to https://code.google.com/apis/console, create your project if necessary (find more info hereGoogle Api Console register).  On the left of panel, go to API Access –> Create new Android key

Create new Android key

The syntax should be SHA1_Fingerprint;Package_Name_Of_Your_App . After creating a new key, an API key will be created, write down this new API key, you’ll need it for your Android app.

Android API Key

3.3. On the panel go Google API Console, go to Services –> Activate Google Maps Android API v2 (don’t be confused with Google Maps API v2)

Activate Google Maps Android  API v2


4. Create Android app to display Google Maps

4.1 Create an Android project. Please note that the package name is the name was used before at step 3.2.
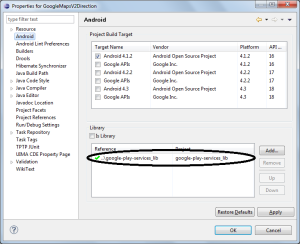
4.2 Make reference to google-play-services.

On Eclipse, import new android project and navigate to \extras\google\google-play-services\libproject\google-play-services_lib and import it.

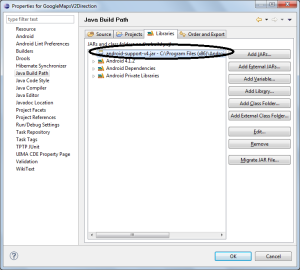
Now go to your Maps project. Click on Project -> Properties ->

ref

Add the external jar android-support-v4.jar from the location similar to this C:\Program Files (x86)\Android\android-sdk\extras\android\support\v4\

support

5. Specify settings in the Application Manifest.

5.1. Get the API Key and set it AndroidManifest.xml. Add the following element as a child of the element, by inserting it just before the closing tag :

1
2
<meta-data  android:name="com.google.android.maps.v2.API_KEY"
                   android:value="YOUR_API_KEY"/>

substituting your API key for YOUR_API_KEY.  This element sets the key com.google.android.maps.v2.API_KEY to the value YOUR_API_KEY and makes the API key visible to any MapFragment in your application.

5.2. Specify more permissions in the Application Manifest like following

1
2
3
4
5
6
7
8
9
10
11
12
13
14
15
16
17
18
19
<permission
        android:name="com.hintdesk.Google_Maps_example.permission.MAPS_RECEIVE"
        android:protectionLevel="signature"></permission>
<uses-permission
        android:name="com.hintdesk.Google_Maps_example.permission.MAPS_RECEIVE"/>
<uses-permission android:name="android.permission.ACCESS_NETWORK_STATE"/>
<uses-permission
        android:name="com.google.android.providers.gsf.permission.READ_GSERVICES"/>
<uses-permission
        android:name="android.permission.INTERNET"/>
<uses-permission
        android:name="android.permission.WRITE_EXTERNAL_STORAGE"/>
<uses-permission
        android:name="android.permission.ACCESS_COARSE_LOCATION"/>
<uses-permission
        android:name="android.permission.ACCESS_FINE_LOCATION"/>
<uses-feature
        android:glEsVersion="0x00020000"
        android:required="true"/>

android.permission.INTERNET : Used by the API to download map tiles from Google Maps servers.
android.permission.ACCESS_NETWORK_STATE : Allows the API to check the connection status in order to determine whether data can be downloaded.
com.google.android.providers.gsf.permission.READ_GSERVICES : Allows the API to access Google web-based services.
android.permission.WRITE_EXTERNAL_STORAGE : Allows the API to cache map tile data in the device’s external storage area.
android.permission.ACCESS_COARSE_LOCATION : Allows the API to use WiFi or mobile cell data (or both) to determine the device’s location.
android.permission.ACCESS_FINE_LOCATION : Allows the API to use the Global Positioning System (GPS) to determine the device’s location to within a very small area.
<uses-feature android:glEsVersion=”0×00020000″ android:required=”true”/> : Because version 2 of the Google Maps Android API requires OpenGL ES version 2. This notifies external services of the requirement. In particular, it has the effect of preventing Google Play Store from displaying your app on devices that don’t support OpenGL ES version 2.

6. Add Google Maps fragment to activity

1
2
3
4
5
    android:id="@+id/map"
    android:layout_width="match_parent"
    android:layout_height="match_parent"
    class="com.google.android.gms.maps.MapFragment"/>